Sunday, May 20, 2012

Spray painting leather boots!


   I nabbed these pink metallic, leather, cowboy boots from my sister-in-law a couple of weeks ago. They were my niece's and she had outgrown them. Desmond wears pink all the time because I am not a believer in any color belonging to one gender. His favorite sneakers are a pair of light up sparkly hot pink numbers. But I didn't love this color pink so much. So, I decided to spray paint them. I have spray painted leather boots a couple of times and it has worked really well in the past. 
   The first step is cleaning the boots with rubbing alcohol to make sure all the oils and dirt are wiped away, or as much as possible anyway.


   Then you tape off the sole of the shoe so you don't get paint on it. Be real careful to get right up to the edge  of the leather shoe. I placed the edge of the tape right into the fold where the leather meets the hard sole and pressed it down in there, then pressed it down over the edge and under the bottom. You can use small pieces of tape to get around the round shape of the shoe or boot.


   Then spray away! I used a metallic royal blue for the whole boot, then added a dark brown and silver. The covering of the boot in the blue took a few coats and a few turns of the boot. I laid it flat to spray it to prevent dripping. Too much paint will drip. It's better to be patient and do extra coats then to spray it on too heavy.


   Now they are space cowboy, rock star boots for Desmond! I am so jealous. 

Monday, May 14, 2012

Mother's Day Orange Chiffon, Blueberry Cake

  I love, love, love baking. But more than I love baking, I love licking the spoon and the bowl and eating the cake. Always too much of it. I end up frantically handing it out to neighbors or sadly throwing it in the garbage. And pouring ketchup on it. 
   For Mother's Day, my family and I were invited to our neighbor's BBQ at the park in town. I volunteered to bake a cake, because I love to bake and I would have a bunch of mouths to eat it! And because I wanted to celebrate Mother's Day, of course. 
   I felt that it needed to be a layer cake, with blueberries. Is there such thing as blueberry cake? This turned into a massive google search. Is a blueberry muffin recipe the same as a cake recipe? The answer was inconclusive. I found a lot of bundt cakes. I saw some lemon blueberry cakes. That sounded nice. I found and then lost a cake that had orange in it, with the blueberries. This stayed with me and I regretted not  bookmarking it. I hadn't made lemon curd in a while and that seemed like the right thing to do. And is there a recipe for frosting that doesn't take a POUND of powdered sugar?!
   In the end, I turned to my shelf of cookbooks. The paper kind, with pages stained with cooking juices and baking powders. With little hand written notes in the margins by my mom and then later, by me. Things like "Good!" or "Great!!!" or "Line the pan with aluminum foil!" Or my mother's common, "nice".  She used to send me to the supermarket with a list that would have "nice bread" on it. I used to make fun of her for it. Now my heart swells a little when I see her little notes. Now I know what "nice bread" means. 
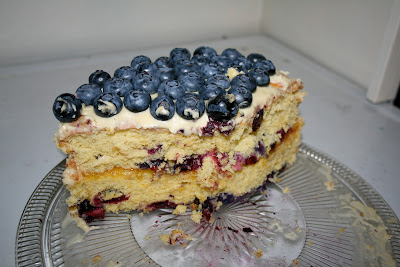
   And so, I turned to Blue Ribbon Recipes, County Fair Winners. Published I don't know when but my mom had it in the 70's and maybe the 60's. I settled on Mrs. Harold Snodgrass's Blue Ribbon Orange Chiffon cake, with Mrs. Chester Talley's Blue Ribbon Cream French Frosting and good ol' Martha Stewart's lemon curd. Except that I added blueberries to the cake and topped it with blueberries as well. The result was exactly what I wanted. Moist, fluffy, tangy and sweet.
   Below are some pictures followed by the three recipes. I think this would be a great birthday cake or a great country wedding cake. It is a keeper for sure. 
   And this time, I was lucky enough to find a neighbor who wanted to eat my cake and not a crumb was wasted. Whew!

Folding in the egg whites. 

Two cake layers, puffed up and fresh out of the oven! 

Layers stacked with lemon curd in between. Parchment paper pieces 
positioned under the cake for frosting, to keep the plate clean.  

Frosted. 

Blueberried with the paper pulled away. 

After the BBQ.  

Pretty on a plate. 


Mrs. Harold Snodgrass's, Salmon, Idaho, Lemhi County Fair, Blue Ribbon Winning
Orange Chiffon Cake

2 1/4 C sifted cake flour (I used all-purpose)
1 1/2 C sugar
3 t baking powder
1 t salt
1/2 C Wesson oil
yolks of 5 medium eggs, unbeaten
grated rind of 2 oranges
juice of two medium oranges
1 C egg whites
1/2 t cream of tartar

  Sift together first 4 ingredients in mixing bowl. Make well in center or flour mixture, add oil, egg yolks, and orange rind. Add water to orange juice to make 3/4 C liquid, add to mixture. Beat with a spoon  until smooth. (Here I added a pint of blueberries into this mixture, stirring to coat the berries).
  Put egg whites in large bowl with cream of tartar, whip until egg whites form stiff peaks. Gently fold the egg whites in with the other mixture until just blended. Do not stir. Pour into ungreased 10" tube pan. (I used two cake pans with the release bottoms. I wish I had greased and floured them, I will try that next time. They did stick a little.) Bake at 325* for 65 minutes. (I baked mine for 45 or 50  minutes, checking with a toothpick in the center to see when they were done.) Remove from pans and let cool on cooling rack. (When you cut into the cake, you will see the blueberries sunk to the bottom of each layer but did not disturb the consistency of the cake.)

Mrs. Chester Talley's, Twin Falls, Idaho, Twin Falls County Fair, Blue Ribbon Winning
Cream French Frosting

2 T water
4 1/2 T sugar
2 1/3 C sifted confectioner's sugar
1 egg
1/3 C Crisco
1 t vanilla

   Boil water and sugar together a few minutes. Take off stove. Mix confectioner's sugar and egg, add syrup and stir. Add Crisco and vanilla. Beat until creamy. (I put saran wrap over this, laying it right up against the frosting in the bowl, so it wouldn't harden, and putting it in the fridge overnight to frost the cake the next day and it was fine.)

Martha Stewart's Lemon Curd

  • 3 large egg yolks, strained
  • Zest of 1/2 lemon
  • 1/4 cup lemon juice
  • 6 tablespoons sugar
  • 4 tablespoons unsalted butter, cold, cut into pieces
  1. Combine yolks, lemon zest, lemon juice, and sugar in a small saucepan. Whisk to combine. Set over medium heat, and stir constantly with a wooden spoon, making sure to stir sides and bottom of pan. Cook until mixture is thick enough to coat back of wooden spoon, 5 to 7 minutes.
  2. Remove saucepan from heat. Add butter, one piece at a time, stirring with the wooden spoon until consistency is smooth.
  3. Transfer mixture to a medium bowl. Lay a sheet of plastic wrap directly on the surface of the curd to avoid a skin from forming; wrap tightly. Let cool; refrigerate until firm and chilled, at least 1 hour. (I made this the night before as well and it was fine. I did need to microwave it on a 50% power setting for 40 seconds to make it soft enough to spread.)
Assembling the cake

   I took a large serrated knife and cut the fluffy top off of one cake to make a flat surface for the lemon curd and second layer. I placed it on a plate, spread all of the lemon curd on this layer, topped it with the second. I placed parchment paper pieces under the edges of the cake to keep the plate clean and frosted the cake with pretty much all of the frosting. I removed the paper. I took another pint of blueberries, washed and dried them by rolling them around on a towel, and placed them all on top.
   Pretty much everything but the blueberries was organic, which I think makes it taste that much better. I hope you try this recipe and love it! 


Friday, April 6, 2012

Those rainbow Jello eggs.....

   I thought the pictures of those rainbow Jello eggs floating around the Internet looked super delightful and I needed to bring a dessert to our annual family Easter gathering, something the "kids would like." Well if kids don't like rainbow Jello eggs, I don't know what they like.
   But, I could not find a real recipe for these eggs. I found a suggestion of a recipe that led to a sort of recipe. But how much cool whip, sour cream, yogurt, etc. do you add? How long is long enough for the Jello to become tacky but not fully set to add the next layer? How much Jello do I need to make to make a dozen eggs? The whole box seemed like too much. So I set out to come up with a real recipe. Here is what I did and this is what happened....
   I bought 6 colors of Jello; red, orange, yellow, green, blue and purple. I used only half of each box for 12 eggs. Each box is about 6T of powder. So I used 3T of powder, 1/2 C hot water and 1/2 C cold water. I made all 6 colors at the same time. I sprayed the egg molds really well with Pam cooking oil spray, using my finger to make sure the whole inside of the egg was coated. Terrified I would go through all this trouble and the eggs would fall apart. Yikes!
   I used a small plastic medicine syringe, the kind that comes with kids medicine because that is what I had in the house. I put two syringes full of red Jello in the egg mold first. Then I whisked in 1T of sour cream to the remaining Jello in the bowl. I kept checking the molds every five minutes to see when they would become tacky but not be too set that the layers would not stick together...   After 25 minutes of checking and not getting a set at all, I put all the other bowls of Jello in the fridge to cool. I guess I could have done the "quick set" directions on the box with the ice-cubes but I did not know ahead of time.
   Finally at 27 minutes I added the same amount for the second layer of the red with the added sour cream. This layer mixed in with the first layer in a few eggs, but most stayed on top. I waited 10 minutes for the orange layer and squirted that in, some fell through again, some stayed on top. 
   Then my 2 1/2 year old slipped and fell and wacked his nose and cheek and chipped a tooth. Off we went to emergent care. So the beginnings of the rainbow Jello eggs, which was not going so well would not get finished. 
   When we came home, I dumped all the extra jello in a bowl and it turned brown and I stuck it in the fridge. I will probably throw it out because honestly, I am not a fan of Jello. It is full of artificial garbage and is way too sweet. I will never try to make these eggs again. If you do, I wish you great luck and patience and time to finish. 
    

Thursday, April 5, 2012

Easta Eggs

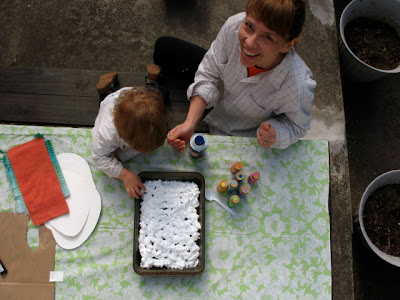
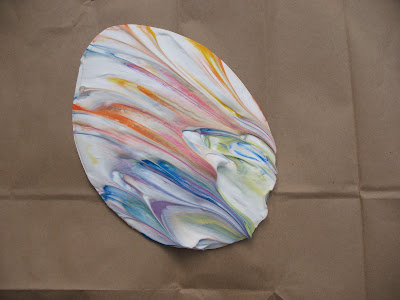
   So, Desmond and I attempted this project I saw on line. Here is the link to the original -    http://littlewondersdays.blogspot.com/2011/03/shaving-cream-painted-easter-egg-cards.html. It was not all I hoped it would be. For one thing, it was very messy and the clean up was a pain in the butt. The eggs came out pretty descent  but they smell strongly like shaving cream. I am not so sure I'd do it again. But that shaving cream with the paint swirled in it sure was pretty! Here are some pictures.

The shaving cream is in the tray. 

Swirling the paint with a plastic spoon together. 

Pressing down our egg.

Lifting our egg out of the cream.


Shaving cream peaks


Ta da!

Paper egg with the shaving cream still on.


Here are our smelly finished eggs.

Saturday, March 31, 2012

Photo Garland

   I made this after Christmas but you can make one anytime. This a great use of those Christmas cards you get with photographs of your friends and family. I didn't want to get rid of last year's pictures when this year's arrived in the mail. Instead of sticking them in a box, I made a garland that I could keep up all year long. You could do this with any photos or any cards. I love reusing cards as decorations. Here are pictures of the process. Easy as pie. 

I cut the photo cards and a few other pretty cards into soft cloud shapes with scissors. You'll need a hole punch and some yarn. 


I laid out the shapes on a table in the order I wanted them to hang.


String the yarn through the holes and tie a knot to keep it in place. Space them evenly apart.  This is the garland hanging on a blank spot on our bulletin board. Those sweet faces are my nieces and nephews. 


It looks nice hanging across a painting or with other photos. 


Or hung across the top of a window.


It ended up back on our bulletin board with our photos and art. 
  

Mud Kitchen

   Desmond is trying out a preschool that my friend Danielle runs out of her house called Art and Soul. She has a mud kitchen in her yard and this inspired me to make one for Desmond. There is a wonderful flea market on 9W in Ravena NY, that is a glorious junk shop with aisles and piles of THINGS. This is where I did most of my shopping, except for a couple of dollar store things. I love the idea of reusing old things and giving them new purpose. Here are some pictures I took as I put the kitchen together. I am sure it will evolve over time. I am trying to let go of the order and cleanliness that is my wish for the mud kitchen. First of all, it is not mine per say and second of all it is a MUD kitchen. 


Spidey, the family dog, checking out the kitchen. Sorry Spidey, no food here. 


We have different sized bowls with spouts to practice pouring, a pot, some muffin tins, fun utensils, a funnel, a big bowl for water, plates, cups and forks, knives and spoons. I have since added a couple of strainers, mustard and ketchup squirt bottles, some wooden spoons and a bench for sitting.


I tied a few hooks to twine and made a place to hang things on the fence.


Lookin' good!


Oh! Chalk! 


Desmond jumps right in. We fill the big yellow bowl with water and he tries out the ladle. 


He adds water to a bowl of dirt. "Watcha makin', Desmond?" 


"Bread," he says.


Happy day! Happy mud kitchen!

Friday, March 16, 2012

Irish Soda Bread

   Happy St. Patrick's Day! I got my clover garland up from last year which I still love. When Desmond gets up from his nap, we'll make a leprechaun trap! I filled his head with leprechaun images on youtube before he went to sleep....  And I want to share the very best irish soda bread recipe with you. My mom's. Although I don't know where she got it and she didn't come up with it herself. But it's easy and so delicious. Please make some, you won't regret it! This recipe makes 2 round loaves. Here it is :

4 C flour
2 t salt
1 1/2 t baking soda
1/4 t baking powder
1/3 C sugar
1 3/4 C raisins
2 T caraway seeds
1 3/4 C sour cream
2 eggs

   Sift dry ingredients in a big bowl and mix together. Add in raisins and seeds. In a separate bowl combine sour cream and eggs. Make a hole in the flour and stir in wet ingredients. Mix until moistened and a ball forms. Spilt into two round loaves. Place both on a floured baking sheet not touching. Slash cross on top with sharp knife. Bake at 350* for 45 minutes.
   I usually substitute whole wheat flour in every recipe and honey or maple syrup for sugar but I haven't tried it with this. If you do, will you let me know how it turns out?

.....Made our bread, some rainbow sugar cookies cut into clovers for our traps and set our traps outside! Tomorrow Desmond will find a pair of leprechaun shoes filled with green jelly beans in exchange for the pretty fool's gold and cookies. You can't fool a leprechaun.

My Irish Soda Bread. The raisins that fall off are the best part.

YUM

My attempt at rainbow colored, clover shaped, sugar cookies.

Spray painted tuna cans, leprechaun blankets, cookies and fool's gold.

Desmond adds colorful umbrellas, because, leprechauns love rainbows.


The cookies, comfy beds and fools gold are in place.

When Irish eyes are smiling!

Leprechaun shoes and a note for Desmond.