Monday, September 24, 2012

Bat Balls Recipe

1 C  uncooked rolled oats
2/3 C unsweetened coconut flakes
2 T  unsweetened cocoa powder
1/2 C  ground flax seed or wheat germ (I like the flax seed better)
pinch or two of salt
1 t vanilla extract

1/2 C peanut butter or nut butter of your choice
1/3 C honey

1/4 to 1/3 C raisins
1/4 to 1/3 C unsweetened 100% dark chocolate bar cut into small pieces like chocolate chips

   Mix the first 6 ingredients in a large bowl. Then add the honey and nut butter. When everything is well combined, add the raisins and chocolate chips.
   Use your hands to roll into small balls. Enjoy!

Sunday, September 16, 2012

Marshmallow love.

   I have been on a bit of a quest to find or come up with a perfect recipe for some healthy marshmallows. Desmond, my three year old, loves marshmallows, as do I. But I don't really buy foods with preservatives or food coloring and all that jazz. That stuff is bad for you, dontcha know. And the marshmallows at the health food store are $5 or $6 bucks a pop! AND they have corn syrup in them. 
   I had made some marshmallows when my son turned one. For some recipe, I forget what it was, maybe a s'mores cookie? It was such a sticky mess, I thought I'd never do it again. But then I got it in my head to try again and looked for a different recipe on line. Because we had to find a healthy way to satisfy our love of marshmallows.
   I found one for a homemade marshmallow made with corn syrup and sugar. This was a better recipe, because I did not have a gooey mess and also better because it had no preservatives, but these were a little like crack to me. I am convinced that some day, corn syrup, especially high fructose corn syrup will be like the cocaine that used to be in Coca-Cola. (I have never actually tried crack, FYI) 
   Then I found a recipe for marshmallows using only honey as a sweetener. YUM! These were very good! Tasted a little different than the marshmallows made from sugar but had a great texture, soft as a baby's bottom and tasty too. 
   I started to think about the gelatin. I am not a vegetarian but I got the sense that gelatin is not produced in a healthy way. I googled it. It's not. AND I recently read that most inexpensive gelatin has aluminum in it. Huh. 
   I read about agar agar as a gelatin alternative and so I got some, even though it was super expensive compared to gelatin. Odd that seaweed would cost more than an animals life, right? Odd but true. But, I had no luck at all making marshmallows with agar agar. I tried 2 batches and they were both disastrous. I thought I had read somewhere that you could replace gelatin with agar agar. And I guess you can, but I didn't pay attention to the difference in amounts that is suggested. I used the same amount as I would use of gelatin. I think you need less actually. But my marshmallows didn't fluff much and were very wet, the agar agar was lumpy too. I tried a different recipe with egg whites and that didn't help. Also, I didn't like having to add the extra step of dealing with egg whites. But like I said, I don't think I did it right in the end. And it deserves to be revisited at some point. 
   I went back to gelatin with newfound appreciation. Ah, the fluff! The whipped whiteness all marshy and mallowy! 
   I made two batches again and they got moldy quickly! I thought the first batch was because I had tried dusting some with cocoa powder and that had changed something. But the next batch got moldy too. Must have been the warm kitchen in summer. From now on, they go in the fridge. 
  The last batch I made I decided to try using another sweetener in there, to try a new flavor. I wanted to use maple syrup with the honey. I found a recipe on line for maple syrup marshmallows that was almost exact to the honey recipe I had been using except for the maple syrup and 1/4 t of cream of tartar for good "consistency" and quite a bit more vanilla extract. So, I thought I'd try adding those things too.
   Low and behold, I have made the best marshmallows yet. They are so much like the store bought ones, minus that chemical taste and feel but with all the fluffiness, firmness, and taste you hope for when you sink your teeth into that white puff. It's love. I had to write about it and share the recipe. If you want to make a healthy marshmallow, this is the one to try. It is EASY as all get out. 
   The honey ones don't roast on a fire, they just get hot and melt. I haven't tried roasting these and wonder if the cream of tartar wouldn't make a difference for roasting. I'll try it and get back to you. 
   Today I ordered a 5 lb container of powered gelatin from "NOW" brand, which is a health food store supplement company. It is not organic, which I was hoping for but it is all natural and has no aluminum so I feel better about that. Also, apparently, gelatin is like the fountain of youth. Who knew.  I hear it lasts forever as long as you keep it dry and buying it in bulk saves lots of dollars in the long run. And I am hooked on making marshmallows and eating them. Maybe I'll make some for you too. 
   Here is my altered and beloved recipe....


                               3T  gelatin (4 envelopes)
                               1 C  water
                               1/2 C  honey
                               1/2 C  maple syrup
                               1/4 t  cream of tartar
                               1/4 t  salt
                               3 t  vanilla extract
                               corn starch for dusting
                               cooking spray
                               parchment paper

   You can  half this recipe if you don't want too many. I like to make a whole lot. This amount fills a 10" x 16" baking pan but you can put them in anything you want while they set. 

   Spray your pan with cooking spray. This helps keep the parchment paper on the pan. Cover pan with parchment paper. Spray the parchment paper. This will make it easy to lift the marshmallows out of the pan once they are set. 

   Place your 3T (or 4 envelopes) of gelatin in a standing mixer with only 1/4 C of your 1C of water. 

   Put the rest of the water, 3/4 C in a small pot with your 1/2 C of honey and 1/2 C of maple syrup, 1/4 t of salt and 1/4 t of cream of tartar, stirring occasionally.  Heat this to 240* if you can. You need a candy thermometer for this. Or you can try dripping some in some ice water. If it turns into a hard string, it's ready. Listen, this is what I read. But, I can never get it past 200* without it boiling over so I get it to 200* and keep it there for a minute and then I pour it in the mixer and it's fine. If you can get it so it's bubbly and foamy but not boiling over and keep it there for a little bit, I think that would work.

   When it's hot enough, pour it carefully into your mixer. Turn it on low until it is combined. Add your 3 t of vanilla extract. Then crank that baby up and mix it on high for 12 - 15 minutes. It will become an amazing white cloud of awesome. 

    I use a rubber spatula to spread it and I spray it with a little cooking spray, rub it around with my fingers so it's coated. That way, the marshmallows doesn't stick at all. Smoosh it into the pan, it's okay if it's not perfect. I try to just level it out the best I can. 
  
   Then you let it sit for a few hours or overnight. When it has firmed up, you can lift the parchment paper right out of the pan and put it on a cutting board. I like to use a pizza cutter for slicing it up. I spray the pizza cutter with cooking spray and cut it into squares. 

   Get a medium sized bowl, just to keep the powder contained and not all over the place, and put some cornstarch in it. You don't need a lot. Maybe a couple of table spoons. You can always add more. Dip your marshmallows one at a time and coat them all over.

   Now your marshmallows are soft and powdery and ready to eat! Not that you haven't been eating them already! I keep mine in a tupperware container in the fridge. 

   I'd like to strongly recommend eating one with a square of unsweetened 100% cocoa from Ghirardelli. Or any dark unsweetened chocolate. The sweetness of the marshmallow and the bitter chocolate is heaven to me and it's good for ya! 

   Maybe your path always end in a pile of soft marshmallows. Go forth and be merry. 

Sunday, May 20, 2012

Spray painting leather boots!


   I nabbed these pink metallic, leather, cowboy boots from my sister-in-law a couple of weeks ago. They were my niece's and she had outgrown them. Desmond wears pink all the time because I am not a believer in any color belonging to one gender. His favorite sneakers are a pair of light up sparkly hot pink numbers. But I didn't love this color pink so much. So, I decided to spray paint them. I have spray painted leather boots a couple of times and it has worked really well in the past. 
   The first step is cleaning the boots with rubbing alcohol to make sure all the oils and dirt are wiped away, or as much as possible anyway.


   Then you tape off the sole of the shoe so you don't get paint on it. Be real careful to get right up to the edge  of the leather shoe. I placed the edge of the tape right into the fold where the leather meets the hard sole and pressed it down in there, then pressed it down over the edge and under the bottom. You can use small pieces of tape to get around the round shape of the shoe or boot.


   Then spray away! I used a metallic royal blue for the whole boot, then added a dark brown and silver. The covering of the boot in the blue took a few coats and a few turns of the boot. I laid it flat to spray it to prevent dripping. Too much paint will drip. It's better to be patient and do extra coats then to spray it on too heavy.


   Now they are space cowboy, rock star boots for Desmond! I am so jealous. 

Monday, May 14, 2012

Mother's Day Orange Chiffon, Blueberry Cake

  I love, love, love baking. But more than I love baking, I love licking the spoon and the bowl and eating the cake. Always too much of it. I end up frantically handing it out to neighbors or sadly throwing it in the garbage. And pouring ketchup on it. 
   For Mother's Day, my family and I were invited to our neighbor's BBQ at the park in town. I volunteered to bake a cake, because I love to bake and I would have a bunch of mouths to eat it! And because I wanted to celebrate Mother's Day, of course. 
   I felt that it needed to be a layer cake, with blueberries. Is there such thing as blueberry cake? This turned into a massive google search. Is a blueberry muffin recipe the same as a cake recipe? The answer was inconclusive. I found a lot of bundt cakes. I saw some lemon blueberry cakes. That sounded nice. I found and then lost a cake that had orange in it, with the blueberries. This stayed with me and I regretted not  bookmarking it. I hadn't made lemon curd in a while and that seemed like the right thing to do. And is there a recipe for frosting that doesn't take a POUND of powdered sugar?!
   In the end, I turned to my shelf of cookbooks. The paper kind, with pages stained with cooking juices and baking powders. With little hand written notes in the margins by my mom and then later, by me. Things like "Good!" or "Great!!!" or "Line the pan with aluminum foil!" Or my mother's common, "nice".  She used to send me to the supermarket with a list that would have "nice bread" on it. I used to make fun of her for it. Now my heart swells a little when I see her little notes. Now I know what "nice bread" means. 
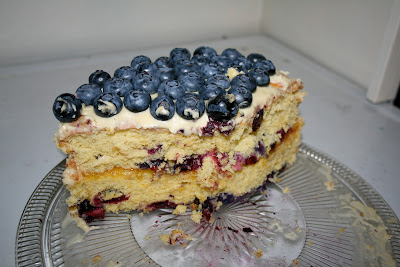
   And so, I turned to Blue Ribbon Recipes, County Fair Winners. Published I don't know when but my mom had it in the 70's and maybe the 60's. I settled on Mrs. Harold Snodgrass's Blue Ribbon Orange Chiffon cake, with Mrs. Chester Talley's Blue Ribbon Cream French Frosting and good ol' Martha Stewart's lemon curd. Except that I added blueberries to the cake and topped it with blueberries as well. The result was exactly what I wanted. Moist, fluffy, tangy and sweet.
   Below are some pictures followed by the three recipes. I think this would be a great birthday cake or a great country wedding cake. It is a keeper for sure. 
   And this time, I was lucky enough to find a neighbor who wanted to eat my cake and not a crumb was wasted. Whew!

Folding in the egg whites. 

Two cake layers, puffed up and fresh out of the oven! 

Layers stacked with lemon curd in between. Parchment paper pieces 
positioned under the cake for frosting, to keep the plate clean.  

Frosted. 

Blueberried with the paper pulled away. 

After the BBQ.  

Pretty on a plate. 


Mrs. Harold Snodgrass's, Salmon, Idaho, Lemhi County Fair, Blue Ribbon Winning
Orange Chiffon Cake

2 1/4 C sifted cake flour (I used all-purpose)
1 1/2 C sugar
3 t baking powder
1 t salt
1/2 C Wesson oil
yolks of 5 medium eggs, unbeaten
grated rind of 2 oranges
juice of two medium oranges
1 C egg whites
1/2 t cream of tartar

  Sift together first 4 ingredients in mixing bowl. Make well in center or flour mixture, add oil, egg yolks, and orange rind. Add water to orange juice to make 3/4 C liquid, add to mixture. Beat with a spoon  until smooth. (Here I added a pint of blueberries into this mixture, stirring to coat the berries).
  Put egg whites in large bowl with cream of tartar, whip until egg whites form stiff peaks. Gently fold the egg whites in with the other mixture until just blended. Do not stir. Pour into ungreased 10" tube pan. (I used two cake pans with the release bottoms. I wish I had greased and floured them, I will try that next time. They did stick a little.) Bake at 325* for 65 minutes. (I baked mine for 45 or 50  minutes, checking with a toothpick in the center to see when they were done.) Remove from pans and let cool on cooling rack. (When you cut into the cake, you will see the blueberries sunk to the bottom of each layer but did not disturb the consistency of the cake.)

Mrs. Chester Talley's, Twin Falls, Idaho, Twin Falls County Fair, Blue Ribbon Winning
Cream French Frosting

2 T water
4 1/2 T sugar
2 1/3 C sifted confectioner's sugar
1 egg
1/3 C Crisco
1 t vanilla

   Boil water and sugar together a few minutes. Take off stove. Mix confectioner's sugar and egg, add syrup and stir. Add Crisco and vanilla. Beat until creamy. (I put saran wrap over this, laying it right up against the frosting in the bowl, so it wouldn't harden, and putting it in the fridge overnight to frost the cake the next day and it was fine.)

Martha Stewart's Lemon Curd

  • 3 large egg yolks, strained
  • Zest of 1/2 lemon
  • 1/4 cup lemon juice
  • 6 tablespoons sugar
  • 4 tablespoons unsalted butter, cold, cut into pieces
  1. Combine yolks, lemon zest, lemon juice, and sugar in a small saucepan. Whisk to combine. Set over medium heat, and stir constantly with a wooden spoon, making sure to stir sides and bottom of pan. Cook until mixture is thick enough to coat back of wooden spoon, 5 to 7 minutes.
  2. Remove saucepan from heat. Add butter, one piece at a time, stirring with the wooden spoon until consistency is smooth.
  3. Transfer mixture to a medium bowl. Lay a sheet of plastic wrap directly on the surface of the curd to avoid a skin from forming; wrap tightly. Let cool; refrigerate until firm and chilled, at least 1 hour. (I made this the night before as well and it was fine. I did need to microwave it on a 50% power setting for 40 seconds to make it soft enough to spread.)
Assembling the cake

   I took a large serrated knife and cut the fluffy top off of one cake to make a flat surface for the lemon curd and second layer. I placed it on a plate, spread all of the lemon curd on this layer, topped it with the second. I placed parchment paper pieces under the edges of the cake to keep the plate clean and frosted the cake with pretty much all of the frosting. I removed the paper. I took another pint of blueberries, washed and dried them by rolling them around on a towel, and placed them all on top.
   Pretty much everything but the blueberries was organic, which I think makes it taste that much better. I hope you try this recipe and love it! 


Friday, April 6, 2012

Those rainbow Jello eggs.....

   I thought the pictures of those rainbow Jello eggs floating around the Internet looked super delightful and I needed to bring a dessert to our annual family Easter gathering, something the "kids would like." Well if kids don't like rainbow Jello eggs, I don't know what they like.
   But, I could not find a real recipe for these eggs. I found a suggestion of a recipe that led to a sort of recipe. But how much cool whip, sour cream, yogurt, etc. do you add? How long is long enough for the Jello to become tacky but not fully set to add the next layer? How much Jello do I need to make to make a dozen eggs? The whole box seemed like too much. So I set out to come up with a real recipe. Here is what I did and this is what happened....
   I bought 6 colors of Jello; red, orange, yellow, green, blue and purple. I used only half of each box for 12 eggs. Each box is about 6T of powder. So I used 3T of powder, 1/2 C hot water and 1/2 C cold water. I made all 6 colors at the same time. I sprayed the egg molds really well with Pam cooking oil spray, using my finger to make sure the whole inside of the egg was coated. Terrified I would go through all this trouble and the eggs would fall apart. Yikes!
   I used a small plastic medicine syringe, the kind that comes with kids medicine because that is what I had in the house. I put two syringes full of red Jello in the egg mold first. Then I whisked in 1T of sour cream to the remaining Jello in the bowl. I kept checking the molds every five minutes to see when they would become tacky but not be too set that the layers would not stick together...   After 25 minutes of checking and not getting a set at all, I put all the other bowls of Jello in the fridge to cool. I guess I could have done the "quick set" directions on the box with the ice-cubes but I did not know ahead of time.
   Finally at 27 minutes I added the same amount for the second layer of the red with the added sour cream. This layer mixed in with the first layer in a few eggs, but most stayed on top. I waited 10 minutes for the orange layer and squirted that in, some fell through again, some stayed on top. 
   Then my 2 1/2 year old slipped and fell and wacked his nose and cheek and chipped a tooth. Off we went to emergent care. So the beginnings of the rainbow Jello eggs, which was not going so well would not get finished. 
   When we came home, I dumped all the extra jello in a bowl and it turned brown and I stuck it in the fridge. I will probably throw it out because honestly, I am not a fan of Jello. It is full of artificial garbage and is way too sweet. I will never try to make these eggs again. If you do, I wish you great luck and patience and time to finish. 
    

Thursday, April 5, 2012

Easta Eggs

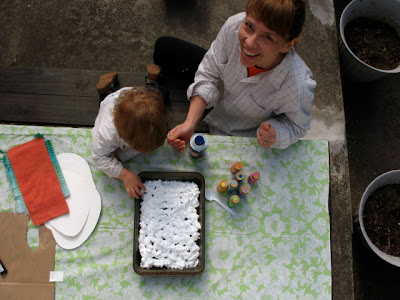
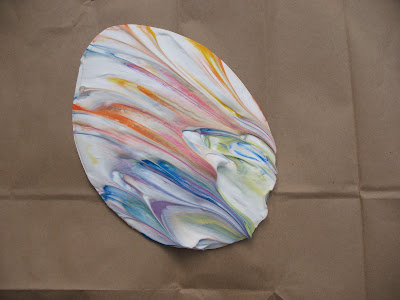
   So, Desmond and I attempted this project I saw on line. Here is the link to the original -    http://littlewondersdays.blogspot.com/2011/03/shaving-cream-painted-easter-egg-cards.html. It was not all I hoped it would be. For one thing, it was very messy and the clean up was a pain in the butt. The eggs came out pretty descent  but they smell strongly like shaving cream. I am not so sure I'd do it again. But that shaving cream with the paint swirled in it sure was pretty! Here are some pictures.

The shaving cream is in the tray. 

Swirling the paint with a plastic spoon together. 

Pressing down our egg.

Lifting our egg out of the cream.


Shaving cream peaks


Ta da!

Paper egg with the shaving cream still on.


Here are our smelly finished eggs.

Saturday, March 31, 2012

Photo Garland

   I made this after Christmas but you can make one anytime. This a great use of those Christmas cards you get with photographs of your friends and family. I didn't want to get rid of last year's pictures when this year's arrived in the mail. Instead of sticking them in a box, I made a garland that I could keep up all year long. You could do this with any photos or any cards. I love reusing cards as decorations. Here are pictures of the process. Easy as pie. 

I cut the photo cards and a few other pretty cards into soft cloud shapes with scissors. You'll need a hole punch and some yarn. 


I laid out the shapes on a table in the order I wanted them to hang.


String the yarn through the holes and tie a knot to keep it in place. Space them evenly apart.  This is the garland hanging on a blank spot on our bulletin board. Those sweet faces are my nieces and nephews. 


It looks nice hanging across a painting or with other photos. 


Or hung across the top of a window.


It ended up back on our bulletin board with our photos and art.